Revised On: 4th September, 2015
 Taking good care of our electric shavers will result in a cleaner, closer shave and help the shaver to last longer. Cosmetically, cleaner shavers will offer closer and smoother shaves, as they wont have hairs and bits of skin clogging the cutting blades of the shaver. Hygienically, cleaner shavers will not play as host to nasty bacteria. This will also reduce the risk of any bacteria entering any nicks or cuts you might have . Simply, cleaner shavers make more effective pieces of grooming equipment. The shaver’s blades can move freely and easily to ensure maximum performance resulting in closer shaves, and will also place less stress on its motor so it lasts longer.
Different brands of shavers require different cleaning methods, as advised by the manufacturers. So, we will list different methods and techniques for cleaning a shaver as advised by the manufturer and some tips along the way. But remember, it’s best to read the manuals.
Manual Cleaning
Disconnet the power cord from the shaver or unplugged it from the outlet if the power cord can’t be detached from the shaver prior to cleaning.
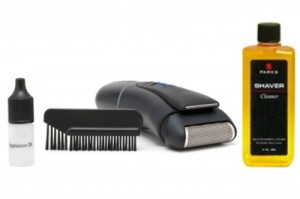
Some shaver brands require a special brush for manual cleaning and some do not. Luckily, most shavers now come with a special cleaning brush. You will also need some lubricant or oil (if required),as well as water and soap for these steps. Some reasons why we might have to do manual cleaning include: the shaver doesn’t have its own cleaning-charging system dock, maybe don’t transport the cleaning system when traveling, or perhaps you have run out of cleaning cartridges.
Panasonic Shavers are best cleaned with their self-cleaning and recharger system (if it has one) or with “sonic” vibration turbo mode especially if the ‘faucet’ symbol appears on the shaver’s LCD panel.
1After disconnecting the shaver’s power cord, apply some hand soap and water on the shaver’s outer foil.
2 Unlock the switch lock button by sliding the ON/OFF switch downwards. Then, press and hold the ON/OFF switch for more than 2seconds to activate turbo mode of its ‘sonic’ vibrating cleaning mode. After around 20seconds it will automatically turn off,ulternatively press the OFF/ON switch again to turn it off mannually.
3 Then, remove the shaver’s outer foil and hold the ON/OFF switch button for more than 2 seconds to activate its turbo ‘sonic’ vibration cleaning mode again. And, place its outer foil under running water afterwards.
After taking all the steps above, make sure to turn off the shaver and then turn it on again in order to cancel the turbo mode, as it can damage your skin when shaving in turbo mode.
4 Gently wipe off any drops of water you see with a clean dry cloth. Completely dry the outer foil section and the shaver before putting it back together.
Braun Shaver’s unit should be detached from its power cord and the shaver should not be used until the shaver has completely dried.
1You can use some liquid soap but without abrasive substances. Turn on the shaver (cordless) then rinse its shaving head under hot running water until all foam are rinsed off. Let it run for another few seconds.
2Switch off the shaver, remove the foil and cutter cassette by pressing the release button. Let it dry. Sometimes you can use the brush to thoroughly clean the inner area of the shaver’s head. Do not brush its cutter cassette as it could damage it.
3When the shaver unit has dried, reassemble the shaver . Also you can apply some oil or lubricant especially when you clean the shaver with running water regularly. Simply, apply a drop of light machine oil on your finger and gently rub it on top of its foil and cutter cassette.
Philips Norelco Shavers when rinsing its razor heads, some water would drip out of the razor’s base. This is just a common occurrence.
1Always turn OFF the razor and remove it from its charging stand if applicable. Rinse the shaving heads under hot running water for a few minutes.
2With your forefinger and thumb, individually pull the shaving heads open. Place all 3 heads and 3 hair chambers under running hot water, allowing the water to run for at least 30seconds around all its openings.
3Also, you can use the brush supplied to brush the shaving heads and hair chambers as well. Shake off any excess water and leave it open to dry completely. Carefully press its shaving head back to the shaving unit. You’ll hear it click into position.
Remington Shavers ideally be cleaned this way.
A video from an online store on how to use a clean and lubricant spray.
TIP:When you are cleaning, its the best time to inspect for any cracks and to see if all shaving parts are in good condition. After cleaning, you can spray on some lubricant, but do use it sparingly. When done, test the shaver by turning it on to check if everything runs properly. Also, don’t forget to look at the shaver’s manuals for information about when the blades should be replaced.
Using The Shaver’s Auto Cleaning-Charging System
Most advanced shavers come with their own cleaning and recharging system dock. With a touch of a button, your shaver is clean, charged and lubricated and is always ready for your next use. Even though there are different shaver brands and models, most steps for using the cleaning system are basically the same.
1Plug the auto cleaning-charging system into an outlet. Remove the protective cap from the razor and from the cleaning-charging stand. Correctly place the shaver onto the cleaning-charging dock.
2 Turn on and select the appropriate cleaning and charging settings. Usually, there are of choices a quick, normal, or intensive cleaning setting.
3 Then the auto cleaning and charging system will do the rest. Clean – it will remove all hairs and other matter clinging onto the shaver with an alcohol based cleaning agent. Lubricate – mostly the lubricant is combined with the cleaning solution. Dry – the auto system also has a unique heating function to make sure to dry all delicate moving parts thoroughly.
